 Save
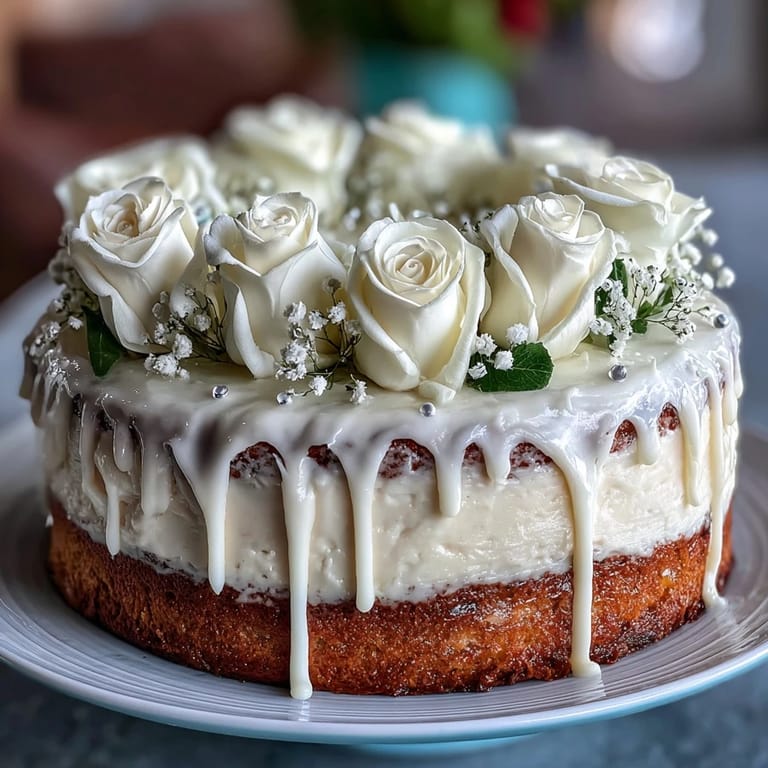
Save My cousin's daughter was turning eight, and her mother asked if I could bake something special for her First Communion celebration. I'd decorated plenty of cakes before, but this one felt different—there was a quiet reverence to it, a need for elegance and grace. I found myself thinking about how a cake could hold meaning beyond taste, how fondant roses and a delicate cross could speak to a milestone moment in someone's life.
I still remember the moment the birthday girl walked into the room and saw her cake sitting on the table. Her eyes went wide, and she whispered to her mom, 'It's too pretty to eat.' Of course, she dove in anyway, and everyone else followed, and within twenty minutes there were just crumbs left—the best compliment a baker can receive.
Ingredients
- All-purpose flour: The foundation that keeps this sponge tender and structural; sift it to avoid lumps and over-working the batter.
- Baking powder: This is your lift—don't skip it or substitute, as it creates that cloud-like crumb.
- Unsalted butter: Room temperature is non-negotiable; cold butter won't cream properly and you'll lose your lift.
- Granulated sugar: Creaming it with butter creates tiny air pockets that become the sponge's structure.
- Eggs: Room temperature eggs emulsify better with the butter and sugar, preventing a grainy texture.
- Pure vanilla extract: The real stuff matters here; it's what gives the cake its warm, sophisticated flavor.
- Whole milk: The acidity helps activate the baking powder and keeps the cake moist.
- Powdered sugar: Sift it before using to avoid lumps in your buttercream, which will show on the cake's surface.
- White fondant: Buy quality fondant or make your own; cheap versions crack and taste waxy.
- Edible pearls and dragees: These add a whisper of luxury and catch the light beautifully.
Tired of Takeout? 🥡
Get 10 meals you can make faster than delivery arrives. Seriously.
One email. No spam. Unsubscribe anytime.
Instructions
- Prepare your pans and preheat:
- Grease those 8-inch pans generously and line the bottoms with parchment paper—this is insurance against sticking. The oven needs to hit 350°F so it's ready the moment your batter is.
- Combine your dry ingredients:
- Whisk flour, baking powder, and salt together in a bowl. This distributes the leavening evenly, so you get consistent rise.
- Cream the butter and sugar:
- Beat them together for a full three minutes until the mixture looks pale and fluffy, almost like clouds. This is where the cake's tender crumb begins; rushing this step changes everything.
- Add eggs one at a time:
- This patience matters—beat well after each addition so the eggs fully emulsify. If you dump them all in at once, you'll see the mixture break and look curdled.
- Mix in the vanilla:
- This goes in after the eggs when the mixture is already homogeneous, so the vanilla distributes evenly.
- Alternate wet and dry ingredients:
- Start and end with the flour mixture, mixing on low speed just until combined. Over-mixing develops gluten, making the cake tough—you want just enough stirring to bring everything together.
- Divide and bake:
- Pour batter evenly into both pans and smooth the tops. Bake for 30 to 35 minutes; you'll know it's done when a toothpick comes out clean and the edges pull slightly from the pan sides.
- Cool completely:
- Let cakes rest in their pans for 10 minutes, then turn them out onto wire racks. This cooling step is crucial—warm cake crumbles when frosted.
- Prepare the buttercream:
- Beat softened butter until creamy, then gradually add sifted powdered sugar so it doesn't puff up everywhere. Add vanilla, salt, and milk or cream a tablespoon at a time until you reach spreading consistency.
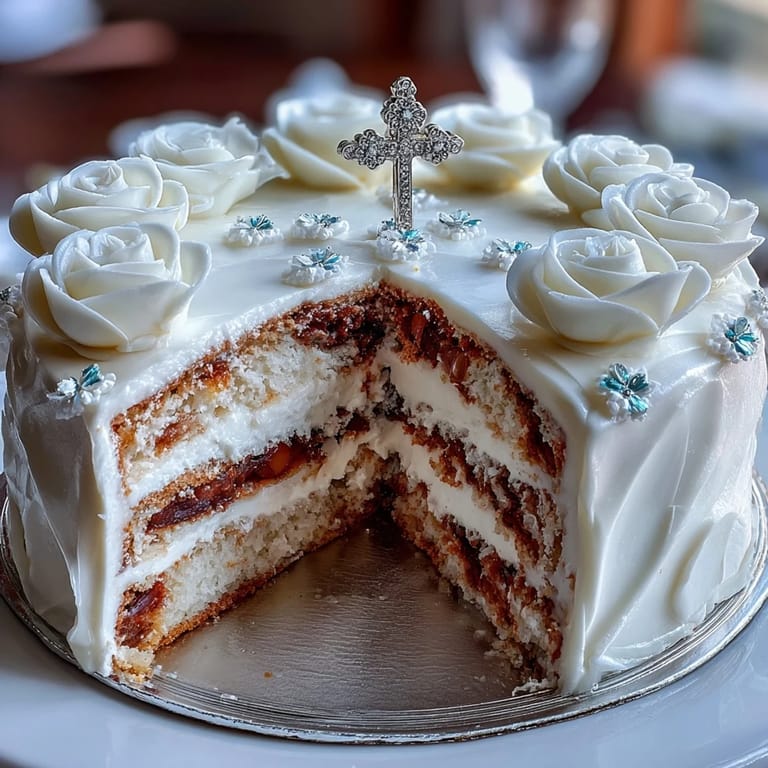
- Build the cake:
- Level the cake layers if they domed, then place one on your cake board. Spread buttercream over the first layer, top with the second, and cover everything with a thin crumb coat—this seals in any loose crumbs.
- Chill and finish frosting:
- Refrigerate for 20 minutes, then apply your final, smooth layer of buttercream. This second coat looks polished and professional.
- Create fondant roses:
- Roll small balls of fondant, flatten them into petal shapes, then layer them together to form blooms. It's meditative work that looks impressive but forgives small imperfections.
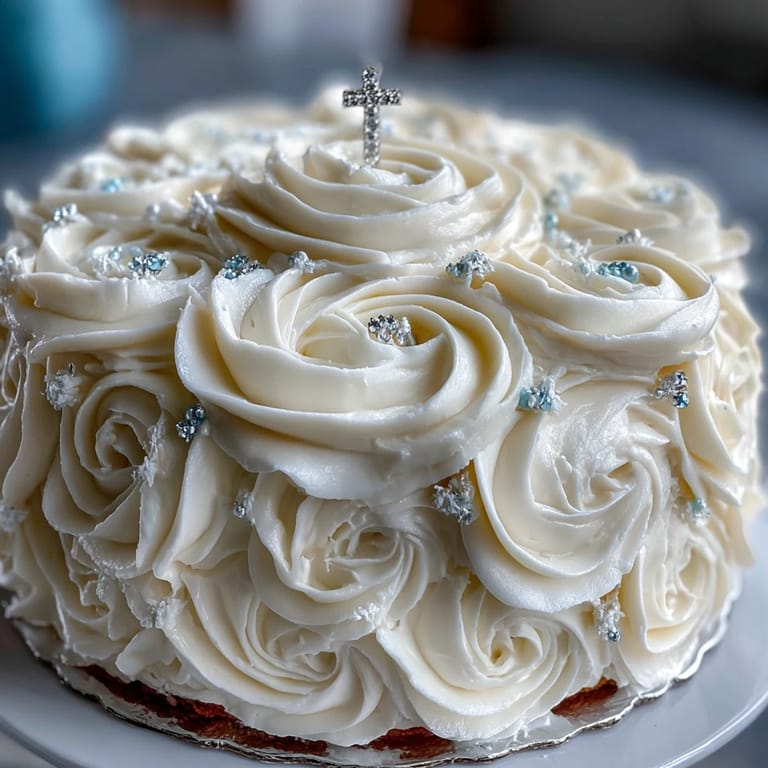
- Decorate with intention:
- Arrange your fondant roses and leaves around the cake, then add edible pearls for shimmer. Place the cross topper at the center or wherever it feels balanced.
- Chill before serving:
- Give the finished cake time in the fridge so the fondant sets and the buttercream firms up, making it easier to slice.
 Save
Save What struck me most wasn't the technical precision of the cake, but how it became a centerpiece for conversation and memory. Everyone gathered around it, taking photos, talking about the significance of the day, and then the cake brought them all together at the table.
The Secret to Tender Sponge
The difference between a dry, crumbly cake and one that stays moist and tender comes down to the creaming step and the ratio of wet to dry ingredients. When you cream butter and sugar thoroughly, you're creating a stable emulsion that holds moisture. The milk in the batter is just as important as the eggs—it's not just there for moisture, it adds acidity that keeps the crumb tender long after baking.
Working with Fondant
Fondant can feel intimidating until you realize it's just a forgiving putty that responds to warmth and pressure. Keep it covered so it doesn't dry out, work with small amounts at a time, and don't stress about perfection—the roses don't need to look like they came from a five-star bakery, they just need to look like you cared. I've found that watching a fondant rose tutorial once and then just trying it myself taught me more than watching ten videos.
Making This Cake Your Own
While this cake shines in its classic vanilla form, there's room for personalization without losing the elegance. A hint of lemon zest adds brightness, or you could tint the buttercream pale pink or blue if the occasion calls for it. The cross topper is the spiritual anchor, but everything else can reflect your style and the person you're celebrating.
- Add a tablespoon of lemon zest to the sponge for subtle citrus notes that brighten the vanilla.
- Tint small amounts of fondant pastel colors for roses if you want something beyond white.
- Use white chocolate shavings as a textural accent around the base of the cake.
 Save
Save This cake isn't just about the flavors or the decoration—it's about marking a moment that matters. Bake it with that intention, and it will taste like love.
Recipe FAQs
- → What type of flour is best for the sponge?
All-purpose flour is recommended for a tender yet sturdy sponge that holds the layers well.
- → How can I ensure the buttercream is smooth?
Beat the butter until creamy before gradually adding powdered sugar and liquids. Mixing slowly helps avoid lumps and achieve a silky texture.
- → Are there alternatives to butter in the sponge?
Replacing half the butter with vegetable oil can yield a lighter texture while maintaining moisture.
- → How do I shape the white fondant roses?
Roll small fondant balls, flatten and gently shape petals, then assemble them layered to resemble roses.
- → Can this cake be made gluten-free?
Yes, substituting the all-purpose flour with a 1:1 gluten-free blend works well without changing the texture significantly.
- → What is the best way to store the decorated cake?
Keep the cake chilled in a cool environment to preserve the buttercream and fondant decorations until serving.